Posted on

Toon Titan Color Mapping Standard

[vc_row][vc_column][vc_column_text]This document serves a sort of API for the mapping of and application of color and global shading/highlighting within CTA.

This is the color standard that all my characters adhere to in order to not only be compatible across different mods, but also navigates around a minefield bugs and limitations. The adherence to this standard also allows for more dynamic and rich color applications to be achieved that are not possible if you actually did it based on how the original CTA color mappings.

When creating Toon Titan compatible characters and items it highly recommended that this coloring work flow and mapping system be used to ensure the highest quality possible and maximize compatibility across all other characters, body parts, props, and assets.

Global Shades and Highlights

Global shades and highlights are done by painting with transparent paint above the base color. Best way to keep these paints from interfering is to paint in separate layers. Or to keep the painted layers “grouped”. The recommended default colors and transparency ratio is Black at 7% for shades and White at 14% for highlights. You can play around with the transparency to better suit your needs.

NOTE: This is the only time using pure black or pure white is ever suggested. Once if an item starts out as black, those pixels are essentially burned out. Changing the color of an item with burnt out pixel is difficult.  

In CTA when mapping out your vector groups, map your Highlights to Custom 7 and your Shadows to Custom 08.


Shades and Highlights (Global)

  • Highlights          Custom 07
  • Shades                Custom 08

You can make your own global shading combinations by layering shades and highlights of different colors. You do not have to make everything or anything at all. Mapping is only when you want to make that global shade or highlight render style compatible. In the even you ever wish to modify the colors further within CTA.
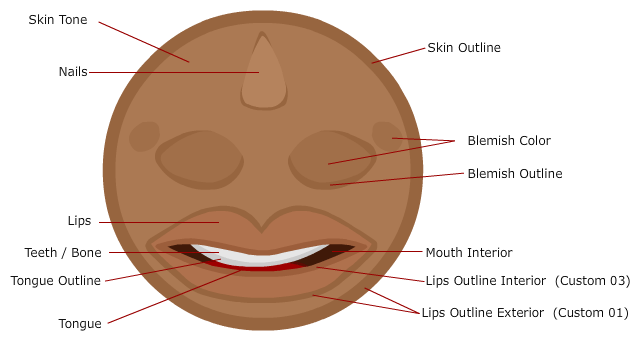
Skin  & Flesh Tones

Primary Flesh Color (Main Skin)

  • Base              Skin 01
  • Outline         Custom 01

Secondary Flesh Color (Secondary Skin, Blemish, Freckles, warts, pimples)

  • Base                 Skin 02
  • Outline           Custom 02
  • Fingernails    Custom 06

There is no outline use on fingernails but if needed you can map it to custom 01.

The Mouth

Lips may use two types of outlines. By default the outline of the lips is the same as the outline of the skin. If it needs to be different such as in the case of female lips where the outline will probably be better if it matches the lipstick color used then map to Custom 03. You may also use both, for example Custom 01 for exterior which makes it match the skin outline while Custom 03 for interior edges which allow for a deeper visual separation.

  • Lips Outline                 Custom 01  (Exterior)
  • Lips Outline                 Custom 03  (Interior)
  • Teeth                             Teeth
  • Teeth Outline               Custom 04
  • Tongue                         Tongue
  • Outline                         Custom 05
  • Mouth Interior          Mouth

Upper Body

This applies for garments used in the upper body. (Neck, arms, torso).

  • Primary Base                   Upper 01
  • Primary Outline              Upper 02
  • Secondary Base               Upper 03
  • Secondary Outline          Upper 04

Lower Body

  • Primary Base                    Lower 01
  • Primary Outline               Lower 02
  • Secondary Base                Lower 03
  • Secondary Outline           Lower 04

Shoes

This applies to all garments or decorations used on the feet.

  • Primary Base               Shoes 01
  • Primary Outline          Shoes 02
  • Secondary Base           Shoes 03
  • Tertiary Base               Shoes 04 * can also be outline for secondary base

Hair

In most cases you can create great looking hair with just your main two color maps, the base and the outline. You can make use of an addition tint and tone for added flare in the case of highly detailed Anime hair. Use your color mappings wisely, remember you also have Global Shading and Highlighting which when combined could easily give double the colors.

  • Primary Base                        Hair 01
  • Primary Outline                   Hair 02
  • Secondary  Base (Tint)       Hair 03
  • Tertiary Base (Tone)           Hair 04

The Eyes

  • Pupil                          Pupil 01 (the little dot inside of the Iris)
  • Primary Iris             Eyeball
  • secondary Iris         Pupil 02
  • Sclera                        Socket (The white part of the eye)
  • Eyelid                       Eyelid (Skin of the eyelid, a 3rd skin color or makeup)
  • Brow                         Brow

Outlines

If a character needs to have an “outline”, from an artistic standpoint, give priority to using “brush strokes” to create those outlines and refer to the items above for how to map those outlines color. For example the main outline color for a characters skin should be mapped to Custom 01. In the event that you are using actual vector outlines then map it to the suggested items above. Again, for example, if it’s a skin outline color, regardless of whether its a brush stroke or an outline, that should be mapped to “Custom 01” and NOT to the “Outline” group.

This will exploit the software’s ability to map out colors while at the same time making it possible to affect “vector outline” properties as a separate process in the render style panel. This way you can take advantage of some of the other render style features, such as the ability to hide vector outlines or convert to various types of RL presets styles.

In terms of the actual mapping item called “Outline” it is recommended to be used as a miscellaneous group. Maybe a unified outline that is the same color across all body parts, or

  • Global Outline/ Misc (Non vector)                          Outline

Do not map “vector outlines” to the Outline group unless that color is supposed to be the same across the entire character.

The Use of Color In General

Try to develop your work with the final color mapping in mind. If you use one color for your characters skin color on one area, then use that same color in other body parts. This will make mapping the colors later a million time faster since you can have the grouping tool chose shapes based on a specific color.

However if you are using a shade of red for an eye and the same shade of red for a freckle, you will have a much more difficult time sorting out the groups in the grouping panel of CTA.

Using a gray scale is highly recommended. It’s easy to change a shade of gray to any color later on in CTA because the pixels are not burned out and is highly neutral and accepting of new colors. This is reason why the original Billy 2.0 model was grey scale.

Try to avoid the use of pure White and Pure Black. CrazyTalk Animator’s coloring system is crappy. It works based on some kind of additive color system that alters an existing item by allowing you to change its brightness, hue, saturation etc….if a color is already black, then the ability to change its color is logically  not going to work. It’s very difficult if not impossible to ad color to something that starts as black So even if you know an item is supposed to be black, in cases where you still think you might use other colors, then just use another color to start with. Later in CTA you can make it black by adjusting the brightness property, but at least you are not limiting yourself from the start.[/vc_column_text][/vc_column][/vc_row]

Posted on

Everything You Need To Know About Symbols in Flash (Adobe Animate)

[wcm_restrict]

[wcm_restrict]
[wcm_nonmember]
Hey there! This page contains additional  members only content :). If you’d like to view this page in it’s entirety, please purchase a membership or login.
[/wcm_nonmember]

This extensive 1 hour guide will go over everything you need to know about about symbols in Flash. This is an essential bit of required knowledge for building your own custom CrazyTalk Animator Characters.

Posted on

Toon Titans CTA Color Mapping for CTA Explained

CrazyTalk Animators stupid coloring system consists of just 4 adjustment sliders.

This article explains my own color mapping system and recommended workflow for CrazyTalk Animator.

In order to promote higher quality use color in CTA and a more user-friendly coloring workflow, as well as improve custom color integration and maximize compatibility among all items color properties of the assets I create, it was absolutely necessary to establish a color mapping standard.

CrazyTalk Animators coloring system is pretty terrible. There is no such thing as an actual color picker, instead much of the colorization you perform in the software is pure guesswork based on four adjustment sliders that simply modify the existing underlining colors as opposed to creating the actual colors desired.

Since we cant just jump into coloring our items to the colors we actually want, our workflow has to adapt to the tools available and in some cases create our own tools.

Render Stylizers

Stylizers are what I call a series of placeholder swatches that can be adjusted using these color modification sliders within CTA itself. You can start with a preset that has already been calibrated to a specific body part or region and use the adjustment sliders to fine tune your color. When the desired color is achieved, you can use the Apply Selected Render Style button to transfer that color from the stylizer to the character or prop.

Since a preset stylizer starts with a predefined color, sometimes it’s impossible to predict or control the end results, all we can do is guess what our color would be, based on a starting point. For better control you can start with blank stylizer, mapp the swatches your self based on what you want, adjust the color, and apply.

Grayscale base Models and Items

The main reason why the majority of my most important base models and items are offered in grayscale format is that by starting with and object that has no significant color information, we can recolor it using CTAs terrible coloring tools to achieve the colors we want without the base colors interfering with the mix. During development, the grayscale format allows us to create variation in shades between the different shapes that allows the CTA vector grouping tool to still differentiate between the various parts, but does not introduce any color information that will later interfere with the users ability to get the colors they want fast.

Unihorns

Introducing the “Unihorn”. This is a special stylizer prop that is predefined for use as a instant skin color preset. All the characters base colors “Skin, Lips, Mouth, Teeth, Fingersnails, Bone, Inner Flesh” are already mapped intro a single style. You chose the preset you want based on a  predefined skin tone. You apply the preset to your character, and he will change into that color without affecting that characters clothing, hair, or shoes. This preset only applies to a characters base color attributes. If you need to further refine a body part, then just use a standard stylizer to do that.

Working with a unihorn stylizer

  1. Chose a unihorn that best represents the characters skin color you want.
  2. If you need it to be lighter,darker, have additional hue or saturation, just use the CTA render style sliders to adjust.
  3. If you are happy with the color configuration, just make the unihorn is selected and click the Apply Render Style Button
  4. Click on the character. It will change into those colors.
  5. If you need to further refine a specific body part, you can use a standard stylizer and repeat the process or just adjust the color proprieties further within the Render style panel.

Saving For Future Use

If created your own color combination, you can reverse the process by transferring the colors from the character back to the unihorn.

  1. Select the character that has the new color combination.
  2. Click the Apply Render Style Button
  3. Click the unihorn. It will now contain all your custom colors.
  4. In the content manager, switch to the “Custom Tab”.
  5. Save it as a prop with its own unique name.

Now you have your own unihorn preset that you can bring into your work any time. This is especially useful if creating something a like a cast of characters that all have their own presets and you want to be able to easily color them at any time. Or in situations where adding an item such as a render style compatible shirt that usually also contains skin information, cause the characters skin to become damaged. You can use your preset to quickly fix this.

Obtaining The Stylizers

You can download stylizers and styler packs starting on May 26, directly from this website. the link will be available here. Refer back to this article as it will continue to grow with further details on how to use them as well as the rest of the color API that you can use if you are developing your own compatible items or are working with the templates and wish to make them compatible with this coloring standard.

there will also be video demonstrations available here in the coming days.

Posted on

How to live the thug life in CrazyTalk Animator

Did your character just do something bad ass?

This video demonstrates how to incorporate this hilarious meme into your CTA animations. The Thug Life Kit is a smart prop that you just drag and drop into your CTA stage, and easily manipulate to add that extra bit of emphasis when ever one of your character does something deserving of the meme. The cholo walk cycle and Thug Life Kit are available for free to members of toontitan.com

Posted on

Creating Animated Hair For Your Characters

[wcm_restrict]

[wcm_restrict]
[wcm_nonmember]
Hey there! This page contains additional  members only content :). If you’d like to view this page in it’s entirety, please purchase a membership or login.
[/wcm_nonmember]

CrazyTalk Animator is a very powerful tool. It is very easy, however, to get lost in all the primary bells and whistles while other features and abilities go undocumented. In this video I demonstrate how to exploit an undocumented ability in order to open up a whole new area of creative possibilities. Site back as watch as I show you how to easily create animated hair for your characters.