

This article explains my own color mapping system and recommended workflow for CrazyTalk Animator.
In order to promote higher quality use color in CTA and a more user-friendly coloring workflow, as well as improve custom color integration and maximize compatibility among all items color properties of the assets I create, it was absolutely necessary to establish a color mapping standard.
CrazyTalk Animators coloring system is pretty terrible. There is no such thing as an actual color picker, instead much of the colorization you perform in the software is pure guesswork based on four adjustment sliders that simply modify the existing underlining colors as opposed to creating the actual colors desired.
Since we cant just jump into coloring our items to the colors we actually want, our workflow has to adapt to the tools available and in some cases create our own tools.
Render Stylizers
Stylizers are what I call a series of placeholder swatches that can be adjusted using these color modification sliders within CTA itself. You can start with a preset that has already been calibrated to a specific body part or region and use the adjustment sliders to fine tune your color. When the desired color is achieved, you can use the Apply Selected Render Style button to transfer that color from the stylizer to the character or prop.
Since a preset stylizer starts with a predefined color, sometimes it’s impossible to predict or control the end results, all we can do is guess what our color would be, based on a starting point. For better control you can start with blank stylizer, mapp the swatches your self based on what you want, adjust the color, and apply.
Grayscale base Models and Items
The main reason why the majority of my most important base models and items are offered in grayscale format is that by starting with and object that has no significant color information, we can recolor it using CTAs terrible coloring tools to achieve the colors we want without the base colors interfering with the mix. During development, the grayscale format allows us to create variation in shades between the different shapes that allows the CTA vector grouping tool to still differentiate between the various parts, but does not introduce any color information that will later interfere with the users ability to get the colors they want fast.
Unihorns
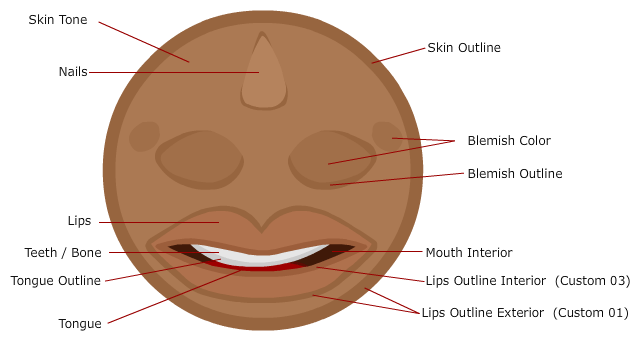
Introducing the “Unihorn”. This is a special stylizer prop that is predefined for use as a instant skin color preset. All the characters base colors “Skin, Lips, Mouth, Teeth, Fingersnails, Bone, Inner Flesh” are already mapped intro a single style. You chose the preset you want based on a predefined skin tone. You apply the preset to your character, and he will change into that color without affecting that characters clothing, hair, or shoes. This preset only applies to a characters base color attributes. If you need to further refine a body part, then just use a standard stylizer to do that.
Working with a unihorn stylizer
- Chose a unihorn that best represents the characters skin color you want.
- If you need it to be lighter,darker, have additional hue or saturation, just use the CTA render style sliders to adjust.
- If you are happy with the color configuration, just make the unihorn is selected and click the Apply Render Style Button
- Click on the character. It will change into those colors.
- If you need to further refine a specific body part, you can use a standard stylizer and repeat the process or just adjust the color proprieties further within the Render style panel.
Saving For Future Use
If created your own color combination, you can reverse the process by transferring the colors from the character back to the unihorn.
- Select the character that has the new color combination.
- Click the Apply Render Style Button
- Click the unihorn. It will now contain all your custom colors.
- In the content manager, switch to the “Custom Tab”.
- Save it as a prop with its own unique name.
Now you have your own unihorn preset that you can bring into your work any time. This is especially useful if creating something a like a cast of characters that all have their own presets and you want to be able to easily color them at any time. Or in situations where adding an item such as a render style compatible shirt that usually also contains skin information, cause the characters skin to become damaged. You can use your preset to quickly fix this.
Obtaining The Stylizers
You can download stylizers and styler packs starting on May 26, directly from this website. the link will be available here. Refer back to this article as it will continue to grow with further details on how to use them as well as the rest of the color API that you can use if you are developing your own compatible items or are working with the templates and wish to make them compatible with this coloring standard.
there will also be video demonstrations available here in the coming days.